


View our Pricing & Plans for a detailed list and comparison of features available in each plan.
Connect your apps and automate workflows with Zapier! Instantly connect Docubee with thousands of apps to automate your documents and forms. Set triggers for important events in your solutions for Zapier to use to begin a workflow instance and manage the workflow.
With Docubee connecting to Zapier at the workspace level, your teams can connect to other applications they need for their business processes.
In this article:
Before You Begin
You need to be on a plan that includes API access.
Create a Zapier account if you don’t already have one.
Connect Zapier to Your Docubee Account
Allow Zapier to access your Docubee account.
- Log in to your Zapier account.
- Navigate to Apps.
- At the upper-right corner of the dashboard, click on + Add connection.
- In the Add a new app connection popup’s App name field enter or search for Docubee.
- Select Docubee from the search result list.
- In the Connect an account | Zapier modal enter your Docubee Workspace API Key (Access token you generated at the workspace level in Docubee).
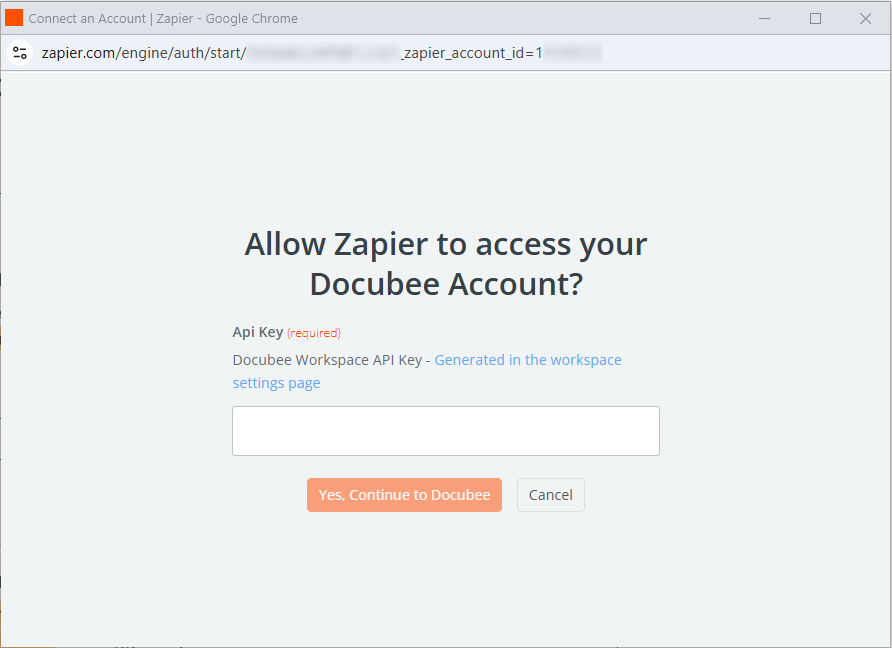
- Click Yes, Continue to Docubee to allow Zapier to access your Docubee account.
Note: You can also refer to the Zapier article Connect your app accounts to Zapier for more information.
Configure Workspace Access
Invite your Docubee users to each workspace and assign them as a member or workspace admin. The Workspace Admin role will be able to generate the API access token which will permit Zapier to access the workflow, select a template, and retrieve the fields for easy mapping.
See Add, Update, and Remove Workspace Members for information on member management.
Add Access Token
- Log in to Docubee.
- On your dashboard’s left panel, click Settings.
- In the left navigation bar, select the workspace to which you want to create an access token.
- Click Access Tokens.
- Select the Add API Token tab.
- In the Token Name field, enter a name for this API connection to Zapier.
- Choose the permission level.
- If you are starting workflows from Zapier you will need the List workflows permission.
- If you are using Zapier triggers in your workflow you will need the Manage Zapier triggers permission.
- Click Generate Token.
- Copy the new generated token to your clipboard by clicking the copy icon or use shortcut keys on your keyboard. You will need it when connecting Zapier to your Docubee account.
See Add API Access Token to your Account in Generate API Access Tokens for more information.
Revoke Access Token
See Revoke API Access Token from your Account in Generate API Access Tokens for more information.
Known Limitations
Zapier can only connect to its approved list of apps.
Related Information
Generate API Access Tokens
All About Workflows (Quick Reference)
Other Integrations via Zapier:
- Capsule CRM Integration via Zapier
- ChatGPT Integration via Zapier
- Keap Integration via Zapier
- Pipedrive Integration via Zapier
Need more help getting set up? Contact us for assistance from our customer support team or register for Office Hours.

")
