View our Pricing & Plans for a detailed list and comparison of features available in each plan.
Add a new document to the Documents library, send it for Quick Sign, or create a contract.
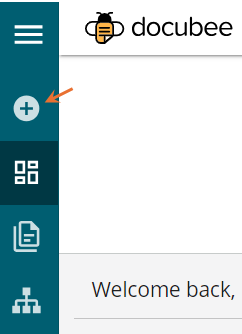
Use the conveniently and centrally located Starting Points button on the left nav bar. You can access it from anywhere in the app!
In this article:
Before You Begin
- Make sure you belong to at least one workspace.
Add a New Document Anywhere
Add a document anywhere using the central Starting Points button.
Click the Starting Points button ![]() on the left nav bar.
on the left nav bar.

The + Starting Points modal will display options for Quick Sign, Contracts, and Upload.
Send a New Quick Sign
- Click Quick Sign to quickly send a new document for someone to sign.
- The New Quick Sign modal will open.
- Select the workspace where you want to upload the document using the Upload to dropdown
- Click one of the following to select your documents:
- Drag and drop, or click to browse, select, and upload files
- Docubee library
- Google Drive
- Box
- Generate with AI
Note: See Upload a Document (Quick Sign) for more information on Drag & Drop / Upload Document (click to browse), Google Drive, Box, Docubee Document Assistant (Generate with AI).
- Click Sign.
The document will be sent for signing.
Create a New Contract
- Click Contract to create a new contract for collaboration, negotiation, and signatures.
- The New Contract modal will open.
- Select the workspace to which you want to upload the contract using the Upload to dropdown.
- Enter the Contract Name.
- Click one of the following to select your contract:
- Drag and drop, or click to browse, select, and upload files
- Create a blank word document
- Select from your Docubee library
- Select from google drive
- Select from box
- Generate with AI
Note: See Upload a Document (Quick Sign) for more information on Drag & Drop / Upload Document (click to browse), Google Drive, Box, Docubee Document Assistant (Generate with AI).
- Click Upload.
The new contract is available for drafting, collaboration, negotiation, and signatures.
Add a New Document in the Docubee Library
- Click Upload to add a new document to your Docubee library.
- The Upload a Document modal will open.
- Select the workspace to which you want to upload the document using the Upload to dropdown.
- Enter the Document Name.
- Click one of the following to select your documents:
- Drag and drop, or click to browse, select, and upload files
- Blank Document to create a blank Word document
- Google Drive
- Box
- Generate with AI
Note: See Upload a Document (Quick Sign) for more information on Drag & Drop / Upload Document (click to browse), Google Drive, Box, Docubee Document Assistant (Generate with AI).
- Click Upload.
The document will be added to your Docubee library and can be used repeatedly.
Known Limitations
The Starting Points button will not be accessible from the workflow builder or workflow instance view.
Related Information
Upload a Document (Quick Sign)
Additional Resources
Need more help getting set up? Contact us for assistance from our customer support team or register for Office Hours.


