Export Document (Workflow Task)
View our Pricing & Plans for a detailed list and comparison of features available in each plan.
The Export Document task enables you to export both documents and data from Docubee workflows directly to their destination. A destination is the account in any of the supported systems with which Docubee integrates.
When any of the supported systems is integrated with Docubee, transfer of ideas and documents is seamless, allowing users to maintain document security and productivity while keeping teams connected.
Export Destinations
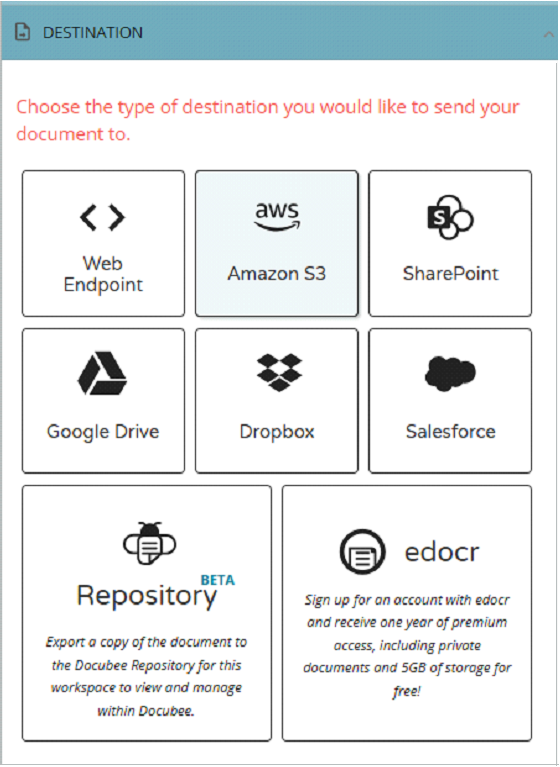
- Web Endpoint
- Amazon S3
- SharePoint
- Google Drive
- Dropbox
- Salesforce
- Docubee Repository
- edocr
In this article:
Before You Begin
- An Docubee account – you can go to Sign Up · Docubee to create a free account.
- You need to create a workflow.
- Access to the destination system to which you are exporting.
- You will connect / log in to the destination account through Docubee, so make sure to have your credentials available.
- Web endpoint – Have the HTTP Method and Endpoint URL ready.
- Amazon S3 – Have your AWS credentials ready.
Note: See AWS Security Credentials for more information about programmatic access to Amazon S3. - SharePoint – Have your Microsoft account credentials ready.
Note: See Sign in to SharePoint for more information. - Google Drive – Have your Google account credentials ready.
Note: You can find more information about logging into Google Drive. - Salesforce – You will need admin access to Salesforce. Have your Salesforce account credentials ready.
If you are not an administrator of your Salesforce account, send the administrator instructions to your salesforce administrator and they can provide you with the information that you need for Docubee. - Dropbox – Have your Dropbox account credentials ready.
Note: See How to log into or out of your Dropbox account for more information. - Edocr – Have your edocr credentials ready.
- You will connect / log in to the destination account through Docubee, so make sure to have your credentials available.
Create an Export Document Task
Note: These instructions are general steps for using the Export Document task. Access destination-specific instructions at Export Destinations for more information.
- Edit the workflow in the workflow builder and give it a suitable name.
- Add a Web Form task. You will need to add two input fields to your web form.
- Add a File Upload field to your web form. In the File Upload settings panel:
- Assign it a Property Name of “Test_Upload”.
- Keep the remaining options as their default settings.
- Add a Text Input field to your web form.
- Assign it a Property Name of “File_Name”.
Note: When the workflow is run, this is where the user will enter the document’s file name that will be displayed in your destination account.
- Assign it a Property Name of “File_Name”.
- (Salesforce only) Add a Text Input field to your web form.
- Assign it a Property Name of “Attachment_Id”.
Note: When the workflow is run, this is where the user will enter the ID of the Salesforce entity to which the document will be attached.
- Assign it a Property Name of “Attachment_Id”.
- Add a File Upload field to your web form. In the File Upload settings panel:
- Add an Export Document task.
- In the Document Settings tab, use the Select a Workflow Document dropdown to select the document from the web form we configured above, “Test_Upload”.
- In the Destination tab, connect to the destination system.
Note: Depending on your selected destination, the fields and/or keys to configure it with Docubee and the information to specify the document location in that system will vary.

- Configure the destination account with docubee.
- Click on the destination you require.
- (Amazon S3 only) Provide S3 credentials.
(Salesforce only) Enter the information obtained from the Salesforce app setup. - Click Connect to <destination system>.
- Follow any prompts and enter your username and password when prompted.
- Docubee will request some permissions, please read it, if you agree and wish to continue, click Accept.
- Set document location in the destination system.
- Configure the destination account with docubee.
- Publish
- Click the green Publish button at the upper-right corner of the workflow builder.
In the above example, we used a File Upload field in a web form to provide a document. However, you can send documents to destination systems from other Docubee actions as well, including:
- A signed document from a Fill & Sign task
- A templated document from a Generate Document from Form Data task
- A combined document from a Combine Documents task
When You Run the Workflow
In the above example, when you run the workflow and upload a document, it will be automatically sent to the configured destination system.
To access your document, log in to the destination system and check the path/storage bucket that you configured in the Export Document task.
Known Limitations
If you change the credentials of your third-party service (for example, updating your password to SharePoint), you will need to re-authenticate the “Export Document” task in the workflow and republish to ensure seamless integration with Docubee.
Related Information
All About Workflows (Quick Reference)
Types of Tasks (Workflows)
Additional Resources
Need more help getting set up? Contact us for assistance from our customer support team or register for Office Hours.


