View our Pricing & Plans for a detailed list and comparison of features available in each plan.
Docubee supports embedding workflows into your web page. You can create the workflow in Docubee and then embed it into your web page.
Embedding workflows allows you to integrate workflows into your already existing web page. You can provide your users with a unified experience to trigger or participate in a workflow without leaving your web page. This means better workflow management, some automation, and a better overall user experience on your site.
This article includes:
- configuring a Docubee account to support embedded workflows and then either start or participate in a workflow instance via the embedded UI.
Before you Begin
To embed workflows you need to prepare the workspace and follow some general guidelines:
- Organization plan – The organization must be on a plan that supports Embedded UI and API Access.
- The Sales or Customer Success teams will assign these features for both trial / development and production environments.
- Workspace API Access Tokens – The workspace (belonging to the above organization) must have one or more API access tokens generated that have the following permissions:
- Start workflow instances
- Complete instance tasks
- Generate Embedded UI URL
Integrate Embedded Workflows
This is an end-to-end handling of a workflow process. It includes the following steps:
- Retrieve the templateId
- Start the workflow instance (with or without user interaction)
- Set up to receive notification when the workflow starts
- Provide an embedded workflow for a participant
- Set up to receive notification of the workflow status
This article assumes you have already created your workflow in Docubee.
Get the templateId
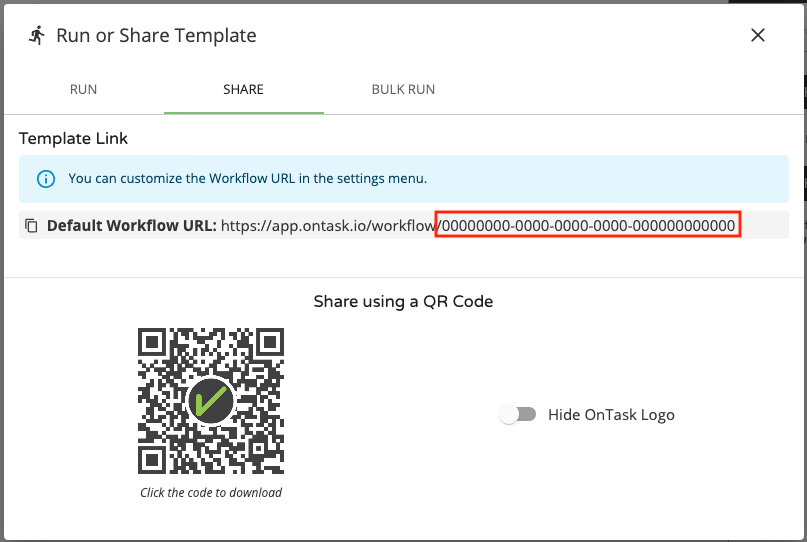
Every workflow has a unique templateId. You will need to retrieve your workflow’s unique templateId.
You can retrieve it in one of the following ways:
- via our API, using the List Workflow Templates endpoint. (See the additionally required permission mentioned under Required Token Permissions. Your workspace administrator will generate API access tokens for it).
- in the UI, on the Share tab of the Run or Share Template dialog.

Start a Workflow Instance
You can start a workflow instance with or without user interaction.
Without User Interaction – Via the API
If you do not need user interaction to start the instance, you can use our API to start the embedded workflow and provide the data for any fields on the initial form in the request body.
This API endpoint returns the instanceId that will be needed for later steps. You can see an example of the response in Start Workflow in the Docubee API Reference documentation.
With User Interaction – Provide an Embedded UI for Using the Workflow
POST https://docubee.app/api/v2/embed(This is a currently documented endpoint.) Takes a definition for an embeddable interface and returns a URL that can be embedded in a parent application that enables the user to perform the defined function. In this case, the embedded UI acts as the originator for an instance of the provided workflow. It will have a Content-Type of “application/json”.
The body of the request:
{
  "data": {
    "templateId": templateId
  },
  "domain": "https://secure.mydomain.com:*",
  "page": "workflowStart"
}
This will return a URL that can be embedded in an iFrame on the provided domain.
Set Up Notification of Workflow Starting
Once the embedded frame loads with the signing interface, the application will emit events to the parent using postMessage. You can listen for the specific changes in state to trigger navigation, content, or removal of the iFrame from the page by using addEventListener.
The code example below shows how to listen for events that come from the iFrame:
window.addEventListener('message', (message) => {
  if (!message.origin.includes('docubee.app')) {
    return;
  }

  const { details, event } = JSON.parse(message.data);

  if (event === 'WORKFLOW_STARTED') {
    // This initial form has been successfully submitted and
    // the workflow is now an in-progress instance. The instanceId,
    // used in later steps is available as details.instanceId
  }
}, false);
Once you have the specific event, you can add your own handlers within your product.
Provide an Embedded UI for a Participant of the Instance
POST https://docubee.app/api/v2/embed(This is a currently documented endpoint.) Takes a definition for an embeddable interface and returns a URL that can be embedded in a parent application to give the user the ability to perform the defined function. In this case, it will provide the interface to complete the tasks assigned to a specified user. The Content-Type will be “application/json”.
The request body:
{
  "data": {
    "instanceId": instanceId
    "participant": participantEmail
  },
  "domain": "https://secure.mydomain.com:*",
  "page": "workflowRuntime"
}
This will return a URL that can be embedded in an iFrame on the provided domain.
Set Up Notification of Workflow Status
Once the embedded frame loads with the signing interface, the application will emit events to the parent using postMessage. You can listen for the specific changes in state to trigger navigation, content, or removal of the iFrame from the page by using addEventListener.
The code example below shows how to listen for events that come from the iFrame:
window.addEventListener('message', (message) => {
  if (!message.origin.includes('docubee.app')) {
    return ;
  }

  const { details, event } = JSON.parse(message.data);

  if (event === 'FATAL_ERROR') {
    // The workflow has encountered a fatal error and cannot
    // continue. A workspace administrator will likely need to
    // look into the problem.
  }

  if (event === 'NO_TASKS_AVAILABLE') {
    // The participant does not have any tasks. It's likely that
    // someone else has work assigned.
  }

  if (event === 'WORKFLOW_CANCELED') {
    // This workflow instance has been canceled. This can occur
    // due to a path the participant followed or due to an
    // administrator canceling the workflow from the dashboard
  }

  if (event === 'WORKFLOW_COMPLETE') {
    // This workflow instance has been completed.
  }
}, false);
Once you have the specific event, you can add your own handlers within your product.
Related Information
Docubee API Reference
Embedded Workflow Automation
Embedded Signing
Embedded Web Forms
Embed eSignatures on Your Site or Application
Glossary
Need more help getting set up? Contact us for assistance from our customer support team or register for Office Hours.


